Help
Adding Columns
When the wizard is open, moving your mouse pointer over the web page automatically highlights page elements that can be marked as data fields. With the Add Column radio-button selected, clicking on a data field or an image will automatically create a new column. In column selection mode Internet Explorer navigation is controlled by the wizard so clicking on a hyperlink does not open a new page.
Chose any record as a sample and using this record simply point to the data you want to collect from all of the records on the web site. Use a right-click for element selection. That will eliminate any side-effects caused by a click, like popups or navigation. As you select new fields, additional columns are automatically created.
Test your columns selection by pressing the Get Data button.
- If the wizard has not identified items correctly, add more sample fields to improve item recognition.
- If only one record has been extracted, make sure that all sample fields belong to the same item.
- Sometimes column layout changes from one item to another. The same text field can be represented using different formatting options or using different HTML elements. Selecting such an element as a sample will cause missing data. In this case, instead of selecting a text element directly, select its parent container, which can be a table cell (TD) or a DIV element.
Click on the Add Details radio-button to add a high resolution image or a detailed description from a Details page associated with the current item. The browser will automatically open that page using the first link found in the column list. When navigation is complete, click on the fields you want to add. To return to the master page press either the Add Columns or the Set Next Element button.
Sometimes a details page contains all information that you need. It is still required to add a link column from a primary list to instruct the program how it should navigate from one details page to another. You can easily delete the extra column from the final output file.
Selecting a Crawling Rule (Next Page element)
Where a web site features a NEXT page option, the Data Toolbar will automatically collect data from all available pages. Once you have completed selecting the data fields, go to the "Set Next element" option. Once this radio-button is selected place your mouse on the Next button on the web page and click. You will then see the Next Element added to the column list.
Editing and Removing a Column
If you have selected a data field you are not happy with, click on the red button on the far right hand side. This will remove the field you have selected. In the same way you can reset the Next page element. The default column names assigned by the program can be edited. Just click on a cell containing the name and type a new name.
Press Clear to clear the column list.
Advanced Column Editing
To get access to advanced column editing options click on the icon in the first column of the data grid.
In advanced editing mode selected element is permanently highlighted with yellow background. Clicking on the web page does not affect the selection.
Advanced options include:
- Easy navigation between child and parent HTML elements. To select a parent element (container) press the top button on the far right side of the form.
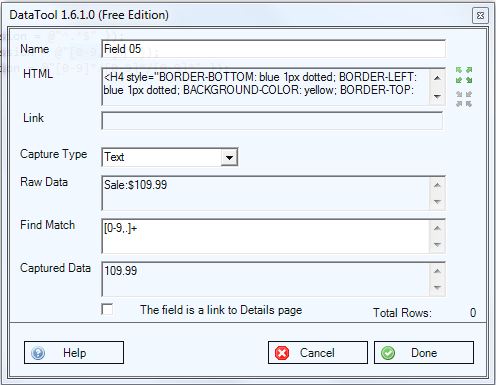
- Changing default capture type. For example, capturing an URL instead of a text. The following four capture types are available: Text, Image, Link, HTML.
- Viewing and selecting inner images of an element. To see all available inner images of an item, select its container element first. That will open an image selection panel. Click on the image on the panel to select it.
- Filtering content using regular expressions is done by entering a regular expression into the "Find Match" text box.
-
Useful regular expressions:
- To extarct a numeric value (i.e. a price) use either [1-9.,]+ or [$][1-9.,]+ expression.
- To extract a text between two strings use start-string(.*?)end-string expression.
- To extarct an email address use (([a-zA-Z0-9_\-\.]+)@([a-zA-Z0-9_\-\.]+)\.([a-zA-Z]{2,5})) expression.
Project Settings
Data Toolbar associates the column list with the web site for which it has been created. The column list is saved and loaded automatically when you close or open the wizard. Besides the column list there are some advanced program options that can be associated with the web site. Select Options to manage advanced project settings.
The Options screen allow you to change download rules for "Details" and "Next" web pages, and export or import a project as text file. Do not change the project settings unless you need to resolve a problem.
Expected site response can be set either to "New page" (default) or "Partial Update". Partial updates are used by web designers to eliminated flickering caused by full page updates. Partial updates do not generate a normal event flow and are processed based on timer events.
Decrease the default value of Delay after page complete event to 0.5 second to improve program performance. Keep it at 2.5 seconds or increase it for pages that use asynchronous JavaScript (AJAX).
Use "Open details page in a hidden window" option to eliminate a page reload when going back from details to master page.
The Web browser tab allows you to run the wizard in "Explorer" or "Standalone" modes. Standalone mode may improve web scraping performance by not showing downloaded content in Internet Explorer and running extraction task as aseparate process.
Project settings can be explicitly exported into an XML file. This can be useful for sites that require multiple data scraping schemes.
Getting and Reviewing Data
Once you have selected the data fields and set the Next Element, click on the Get Data button. The program will start collecting data showing you the number of processed pages and extracted data rows. At any time you can interrupt data scraping by clicking either the Show Data or the Edit Tags button.
After all pages are processed, the wizard goes into Review Data mode.
You can review the collected information before saving it on your computer. The search box can be used to filter data. Checking the Show Complete Text checkbox wraps the text and adjusts the cell's height to fit the text without trimming.
If you are satisfied with the collected information press Continue to go to the Save Data screen.
Save Data
The Save Data screen presents two options: Saving Data and Adding More Data Rows.
Pressing the Continue button on the Save Data Screen will default to Save and Exit. The program can save data as either a CSV, XML or HTML table. These formats can be easily imported into an Excel or Google spreadsheet. If you have added image collection as well, select the desired location of the downloaded images on your computer. Selecting Web location will keep references to the original image locations on the Web. Checking the Open File checkbox opens a generated data file as soon as it gets created.
The Free edition limits program output to 100 records.
For web sites that may not offer a Next button, you can continue to collect data using the Add More Data Rows option. Once selected, press Continue. Next, navigate to the web page from which you wish to collect data and press Get Data. You can repeat this process as often as you like, adding data to the same CSV file before saving. When Edit Columns before adding rows is selected, the standard edit display is shown, allowing you to make any changes required.