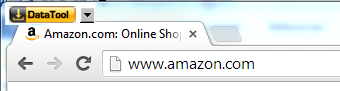
Find a shortcut to Data Toolbar on your desktop or in the Start
menu and run the program. After starting the program, you will
see a browser window with the Data Tool button in the top left
corner of the browser. By default, the program opens Chrome
browser but you can switch to Firefox using the dropdown menu.
If you do not have Chrome installed, the program will use
Firefox. Chrome is more stable and is faster in automation mode
than Firefox. That is why we recommend Chrome for long running
projects. If you use Chrome 57 or later, you will see a message
that Chrome is being controlled by the automation software.
The browser runs in the “private browsing” mode and uses a
separate testing profile that does not interfere with the
browser settings and history. The browsers do not load any
installed extensions. The testing profile is recreated when the
browser restarts. After the restart all saved cookies are
deleted. You can optionally change project properties to keep
cookies with the project.
Chrome browser automation requires a console application
chromedriver.exe (chrome automation server) that may trigger a
firewall warning on the first run. You can ignore the warning.
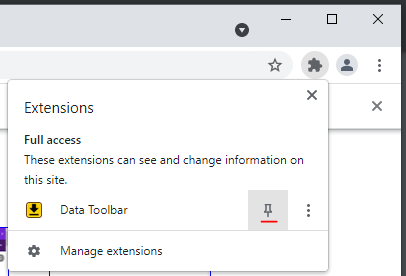
If you do not see the DataTool extension icon
 , click on the Extensions icon in the top right corner of the
Chrome browser and pin the extension Data Toolbar to the
toolbar.
, click on the Extensions icon in the top right corner of the
Chrome browser and pin the extension Data Toolbar to the
toolbar.
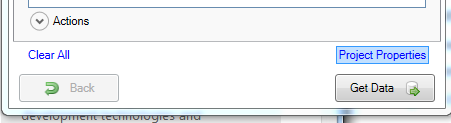
Navigate to the target web page and click the DataTool button.
That will create a default project associated with the target
domain. In our example, we use http://amazon.com as a start URL.
Important: Please note that you need
to navigate to the start URL before clicking the DataTool
button.
If you use the DataTool with the Chrome browser, you can click
the DataTool extension icon at
the top right corner of the browser window instead of the
DataTool button. It provides the the same functionality.
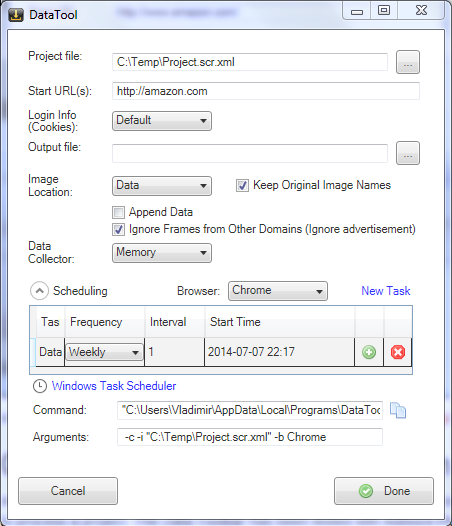
Start URL
Each project requires a start URL. The start URL points to the
webpage where the project will navigate when it starts.
Sometimes the start URL is the primary URL of the website, but
often the required data is on a sub-page. Some websites allow
navigation or redirection without changing the visible URL. In
such cases, you will not have a start URL that points directly
to your preferred start webpage, but will instead need to add
templates to your data extraction project to navigate to that
webpage.
If your
target web site requires a login, you have two options. First, you can sign in before starting
a project using the browser and then set a start URL. You will
have to sign in each time when you restart the program.
Alternatively, you can set the login page as a start URL. Use
the second scenario if you need to schedule an automatic
execution of the program. In this case, the start URL must be a
direct URL and should not contain any session information.
The Project Properties window allows you to set a list of
multiple start URLs.
Project file location
The default project file location depends on the start URL
domain. By default, the project designer saves the project using
the target domain name. If needed, the default domain project
can be saved under a custom name using the Project Properties
screen. Custom projects can be opened using the drop-down menu.
Besides the project itlself the program saves the image of the
starting and the cookies from the last session.
Projects are saved automatically when you close the Project
Designer.
Crawling a Web Site Using Primary or Background Browsers
At any stage of project design you can press the Get Data button
to test the project. If the current URL is different from the
starting URL, the browser opens the starting page in a separate
tab or in a separate window. It usually takes from 2 to 10
seconds to process a page. A project that needs to go through
thousands of pages may take several hours to complete.The data
collection process can be terminated and the collected
information can be reviewed without waiting for project
completion. A data collection task can be scheduled for
automatic execution in
command line mode.
The browser interacts with the target web site as if it was
controlled by a user. When the program imitates a mouse click,
the browser steals input focus from other applcations. That
makes it difficult to use the computer while the tool is
collecting data. The Data Toolbar allows the operator to get
data by running a headless browser in the background with no
visible interface. The background data collection can be started
using the Get Data button dropdown menu.
In background mode the program uses the headless browser mode
supported by Chrome and Firefox. In the meantime the primary
browser stays inactive. The headless browser cannot reuse
session information and browsing history from the primary
browser. For password protected web sites include a login
template into the project. The first "cold" run of the headless
browser requires some time to get started. Subsequent runs start
faster.
Each browser uses its own JavaScript engine and an HTML parser.
Because of that some pages may behave differently and run slower
in background mode.
When the
template editor
is open, all navigation and interaction with the browser must be
done only through the project designer. The designer will
emulate all mouse and keyboard events based on your input. In
design mode moving your mouse pointer over the web page
automatically highlights page elements that can be marked as
data fields. Clicking on a text field, a link or an image
automatically creates a new row in the data-grid. Clicking on a
link does not cause navigation. As you select new fields,
additional columns are automatically created. You can remove
added content or edit its properties.
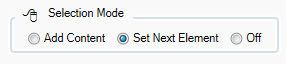
If for some reason you need to interact with the browser
directly, set Selection Mode to Off.
When the first input-button element is added to the template,
the program automatically attaches an action to the element. You
can always remove the action or add it to another element.
Information from elements with attached action or input elements
is not collected.
To move forward between templates, use the Open button. To move
to the previous template, press the Back button.
Do not interact with the web page or the program while the
program is busy (while it displays a spinning wheel).
Each time you restart the program, the browser forgets the login
info. If you set the project to clear cookies, you will always
begin in the same signed out state even if you do not restart
the browser.
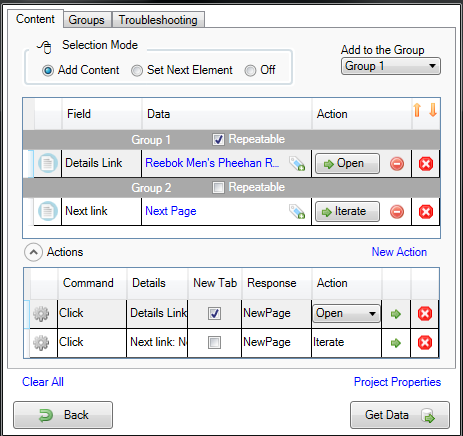
The main element of the project designer is the list of content
elements. There are five columns in the list. The icon that you
see in the left-most column shows the type of the element.
Clicking on the icon opens the Element Properties window. The
“Field” column is an editable name of the element. “Data” column
shows collected or input information.
“Action” column shows if there is an attached action. In most
cases, an action is an equivalent of the mouse click on the web
element. Clicking on the action button opens a new template.
Actions are automatically attached to submit element when the
element is selected. You can manually attach or detach an action
to any element but most often that will be a link element. The
last column of the grid is the delete row button.
Each group of content elements has a separate section in the
list. The section header shows the group name, the group “is
repeatable” property and the number of matching rows of data
(items) per page.
The logic described in this section applies to any search or
login web form. When the project designer is open, highlight and mark the
elements you want to submit. In case of the Amazon main page,
mark the elements of the search group:
- the department drop-down (Search In),
- the text element (Search for),
- the Go button.
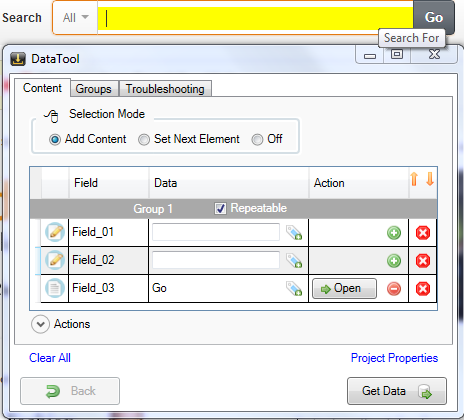
Working with input fields
The next step is setting input values for “Search-in” and
“Search-for” elements (Field_01, Field_02).
To set a drop-down selection or input text, type in the desired
value into the Data column. Optionally, you can enter more than
one value (one per line) using the Element Properties Window.
The program will automatically submit the form for all
combinations of entered values.
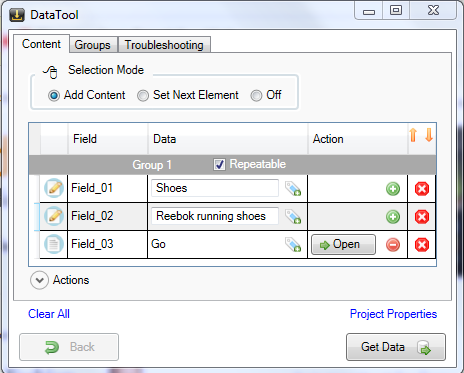
Submitting input
Press the Open button in the data-grid to submit the input. The
program will select the drop down item, key-in the “search for”
string and then click the Go button. The browser will submit a
search request and navigate to the search results page. Wait for
navigation to complete before going to next step.
When the previous action is completed, the browser shows search
results and the project designer opens an empty template. You
can return to the previous template by pressing the Back button
in the designer (not in the browser).
If all data that you need is on the page, add content elements,
set a
paging element
and run the project. All selected elements will be included in
the final output. Note, all selected elements have to belong to
the same list item.
Actions
To iterate through the details pages, choose any link to the
product details page and click on it. The program will add a
link to the list of content elements. To navigate to the details
page associated with the link, attach an action to the link by
pressing
 button. When DataTool runs the project, it will open and process
a details page once for each link in the list. Elements with
attached actions are not included in the final output.
button. When DataTool runs the project, it will open and process
a details page once for each link in the list. Elements with
attached actions are not included in the final output.
The Actions section in the bottom of the window allows you to
see and fine-tune template actions. You can instruct the program
to open the details pages in a new tab. That usually improves
program performance, because it does not need to navigate back
each time it processes a details page. Than feature works best
with Chrome. In case of the Firefox, that option causes problems
in Design mode and it should be set only after your project is
complete.
Paging
Search results usually have a Next Page link that opens the next
page in the navigation set. If this is the case, set selection
mode to Set Next Element and select the Next Page link in the
web page.
The program will add a new group that has only one element with
an attached Iterate action. If you trigger the Iterate action,
Data Tool will not actually open a new template, but the web
browser will navigate to the next page in the search results.
Tip 1: Sometimes, there are only page numbers “1 2 3 ...” and no
any “Next Page” element on the page. In this case you can select
“2” as a next page reference. The program will auto increment
this number and will go through all available pages.
Tip 2: Sometimes, additional content is loaded when the page is
scrolled to the bottom. In this case, you need to select any
stable element (i.e. html/body) as a Next element and set action
Command to Scroll. On the Troubleshooting tab set Exclude
duplicated items checkbox to on.
If we press the Get Data button now, the program will submit the
request and go through all the product pages. The final output
will nonetheless be empty because we have not selected any
content elements. All elements that we have selected are either
Input or Action elements. Data from Action and Input elements is
not included into final output.
Press
 button to remove the action associated with the Details Link.
That will transform the Action element into the Content element.
If we press Get Data button now, the final output will get all
the product titles from the search results.
button to remove the action associated with the Details Link.
That will transform the Action element into the Content element.
If we press Get Data button now, the final output will get all
the product titles from the search results.
Run the project and view the results. Then press the Back button
to return to the Template Editor screen.
Restore the action associated with the Details Page link by
pressing
button.
Collecting Data from a Details Page
Click the Open button to navigate to the Product Details page
and open a new empty template. When navigation is completed,
begin adding content elements for all the content you want to
extract from the details page. Just highlight and click on the
elements you want to collect. Remove automatically attached
actions if you do not need further navigation.
Missing details and linking content to prompts
Sometimes, Details pages show a varying amount of details for
different items. For example, in a product catalog some products
may not have dimensions or weight. In this case, the positions
of the data fields inside the web page shift from item to
another. That happens because web pages do not reserve space for
missing data. However, web data extraction software uses
position information to search for data fields and if their
position changes, the scraper may extract wrong data or no data
at all.
Quite often, a data element on the Details page has a
corresponding prompt element. The text of the prompt does not
change from one item to another. For example, an email prompt
would always be “Email Address:” regardless of its position on
the web page. The actual email address will always follow the
prompt. In this case, we can search the email address using its
prompt instead of its position on the page.
To link element content to a prompt, press
 button. Then highlight and select the prompt on the web page.
The program will modify element’s Name and Data as on the
picture below. Prompts can be removed by pressing
button. Then highlight and select the prompt on the web page.
The program will modify element’s Name and Data as on the
picture below. Prompts can be removed by pressing
 button.
No prompt

After adding the prompt

XPATH and Alternative Element Locations
The tool finds a page element using its position in the document
tree. The element position is specified using XPATH notation.
XPath, the XML Path Language, is a query language for selecting
nodes from an XML document. On some web sites the layout of the
page changes from one item to another and so does the elements
XPATH. If the tool cannot find data, compare the XPATH of the
element on the failed page with the original XPATH.
The tool allows entering multiple paths, one per line into the
XPATH field. It is also possible to filter elements by id, class
or text, i.e. /HTML/BODY/DIV[2]/DIV/DIV[@class="price"]. The
XPATH field is available on the Element Properties screen.
Renaming fields
The Project Designer automatically assigns a default field name
when the field is created. These names will appear in the final
output as the column names. The default names can be changed if
needed. To change a field name, click on the cell and type-in a
new name. Keep the field names unique to avoid confusion. The
name can be also changed using the Element Properties Window.
Extracting data from raw HTML
Some information cannot be extracted directly but it is
available as a part of the HTML code. For example, the product
rating “4.5 out of 5 stars” on the picture below cannot be
selected as the inner text.

To extract the rating from HTML,
- Open Element Properties Window
-
Expand the selection to include span element using the Expand

- Change the Data Capture Type to HTML.
-
Set the Regex Filter to: title=\"(.*?)\" . The filter tells
the system to extract the text between title=" and ".
- Press the Done button to save changes

The product details pages on Amazon, EBay and many other sites
allow visitors to view the high resolution images of the product
and even zoom in by rolling over the image. This section
explains how to extract an uncropped high definition image shown
on demand.

The Amazon product page can have a variable number of thumbnail
images. The thumbnails should be grouped separately from other
fields, because they are organized as a separate list. Each
independent list of content should have its own group.
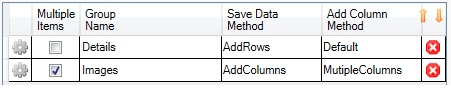
To create a new group:
- Go to the Groups tab.
- Press the Create Group button.
- Change the Group name to “Images”.
· In the Groups data-grid change the Save Data Method to “Add
Columns” and the Add Column Method to “Multiple Columns”. With
these options the Data Toolbar will save the data in the parent
data table, but it will not duplicate the data in the parent
table. Instead it will add new data columns to the parent table.
The data structure of the product catalogue has one data table
(or group) containing product details such as name, rating and
price, and a second data table containing one or more images for
each product. We want an output format like this:
product1, image1, image2,
product2, image1, image2, image3
This can be achieved by setting the option Save Data Method to
AddColumns, which will save the image data in new data columns
in the parent table (the product data table).
The new group is defined as “repeatable”, which means that the
program should attempt to extract thumbnail elements as the list
items.
· Return to the Content tab and select “Images” from the Groups
dropdown. Now all new content and action elements will be
associated with the “Images” group.
· Highlight and select a thumbnail image in the middle of
thumbnails list. That will create a new element with attached
action.
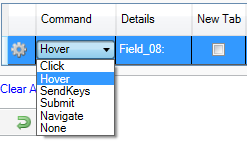
Expand the Actions section and change the action command from
“Click” to “Hover”.
By default, the browser response type is set to “New Page”. In
our case, the action does not cause navigation and no new page
is open as a result of the action. The actual response is a
partial update of the current page. Based on that, the response
type should be set to Partial Update.

Setting response type is optional. Most of the time, the program
is able to detect the partial updates itself and sets the proper
response type.
Click Open button to execute the Hover command. Executing the
action will move the mouse cursor over the thumbnail image and
change the enlarged picture associated with the thumbnail. The
project designer will open a new template.
Highlight and select the enlarged image. That will create a new
element. We could have stopped here and collect the
middle-resolution images 575 x 340 pixels. But we are going to
collect the high-resolution images 1500 x 886 pixels available
in the zoom window.
To collect the image from the zoom window attach an action to
content element created for medium-resolution image. Then change
command type to Hover and execute the action. The browser will
open a zoom window on the web page and the project designer will
create a new empty template.
This time just highlight and select the high resolution image in
the zoom window. Rename the default field name into “Image”.
The project is ready. Press Get Data button and wait for project
to complete. The running project can be terminated before its
completion.
Saving collected information
After all pages are processed, the program goes into the Review
Data mode. You can review collected information before saving it
on your computer. If, instead of the multiple records that you
see on the web page, the program collects just one, press the
Edit Tags button to go back and check that all of the columns
that you selected belong to the same record.
If you are satisfied with collected information, press the Save
button. The output format depends on the output file extension.
The program can save data as a CSV, XML, HTML, XLSX files or SQL
script. These formats can be easily imported into an Excel, a
database or into a Google spreadsheet. If you have added image
collection as well, select the desired location of the
downloaded images on your computer. Please note that writing
directly in XLSX format is slower that in other formats,
especially for large data sets.
Use “Append” option to append new information to already
existing data file. The duplicated rows will be automatically
removed.
Checking the “Open File” checkbox opens a generated data file as
soon as it gets created.
The Free edition limits program output to 100 records. There
are no limitations in the standard edition.
Scheduling for automatic execution and command line mode
To access the scheduling functionality, open the Project
Properties Window by clicking the Project Properties link-button
in Template Editor.
In the Project Properties Window set output file location and
the output file type.
Expand the Scheduling section and click the New Task
link-button. The program will create a new task with default
frequency and interval. Adjust these parameters to suit your
needs and press
button to schedule the task in Windows Task Scheduler.
A scheduled task can removed from Windows Task Scheduler using
button.
Tip: By default, the command line generated by the program
forces the crawler to use the current web browser. That option
can be overwritten. If you need to keep the crawler in
background, select PhantomJS headless browser. The PhantomJS
browser does not have any UI and will not distrupt other
applications. The PhantomJS browser is included in the Data
Toolbar setup file.
An adblocking browser extension can increase web scraping
performances by stopping ads before they get downloaded. That
improves page loading time and the total time required to
process a project. The Data Toolbar has been tested with Adblock
Plus and Adblock. The extension should be installed using a
special procedure described below.
To get an extension to be reinstalled after the browser restart,
place the extension CRX file into the Extensions folder of the
Data Tool product folder. On Windows 7 the full path to that
folder is:
"C:\Users\[User]\AppData\Roaming\Data Tool\Extensions\Chrome".
The easiest way to access that folder is to use “Open product
folder” menu item.
Get an extension CRX files using one these download links:
Adblock Plus,
Adblock.
To download any other Chrome extension to your local drive, use
the online tool from
chrome-extension-downloader.com
or use
Chrome Extension Downloader
. The described procedure is necessary because in the automation
mode the browser starts each time with a new profile and and
loses its settings from the previous session
When the tool runs in the data collection mode using command
prompt, its performance can be further increased by using
-d
option, which disables images download by the browser. The
option does not affect design mode.